How to Draw Sora Step by Step
Hi guys!!!
I'm really impressed by how many people started following me for the short time I'm here!! So a very big THANK YOU for all of you!!
:cookie: :cookie: :cookie: :cookie: :cookie: :cookie: :cookie: :cookie:
You deserve the cookies!! :two_hearts:
Maybe some of you remember the poll I did whether I should do a drawing tutorial or not?
Suprisingly most of you voted for it!! :sparkles:
It's already been a while, so I'm sorry this took so long :sweat_drops:
Tbh it feels like sometimes I'm annoying most of you with my comments or art... I'm sorry!!
。゚(゚´Д`゚)゚。
I'm just a weird person who likes to draw...
Only because I'm doing a tutorial rn, doesn't mean I'm good or better than anyone of you, because art is a thing about own imagination and creativity :sparkles:
I just want to share my experiences with you so feel free to correct me or add stuff!! :two_hearts:
This will be a long post so we better get started!! :tada:
I had to cut things short, because it'd be a too long post then. So here are the things scratched on:
- sketching
- lining
- expressions
- body shape
- hands
- perspective
- tips
Most of this will be based around Sora, bc it would be too long with all of them and he's the mc of KH anyway (*´ω`*)
:pencil2: :pencil2: :pencil2: :pencil2: :pencil2: :pencil2: :pencil2: :pencil2: :pencil2: :pencil2:
The Face
The face is the first thing you recognize when drawing a character (I think when we tell people apart, 80% is due the face). Probably this will be the longest part.
Step 1
(pose/ scenery)
At first before you start the drawing, it's important to make a clear image in your head about what you want to draw exactly. Play a bit with your creativity and go through different scenarios. When you're unsure about what pose or scenario you want to pick, it helps to do a few small doodles. Nothing big, it's okay if they're just stick figures like this:
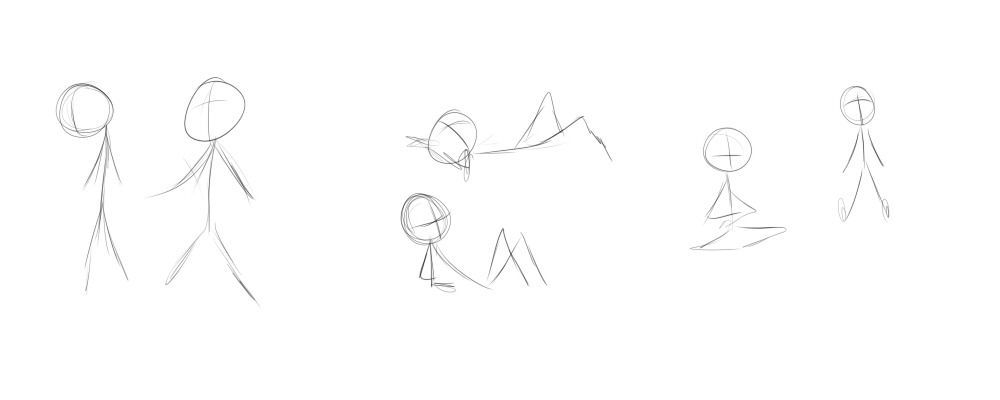
It's only to help your imagination and get a small feeling in what you're about to draw. Nothing to honest or to get specific.
Step 2
(rough body)
Now that you've chosen on what you want to draw, the real sketching starts.
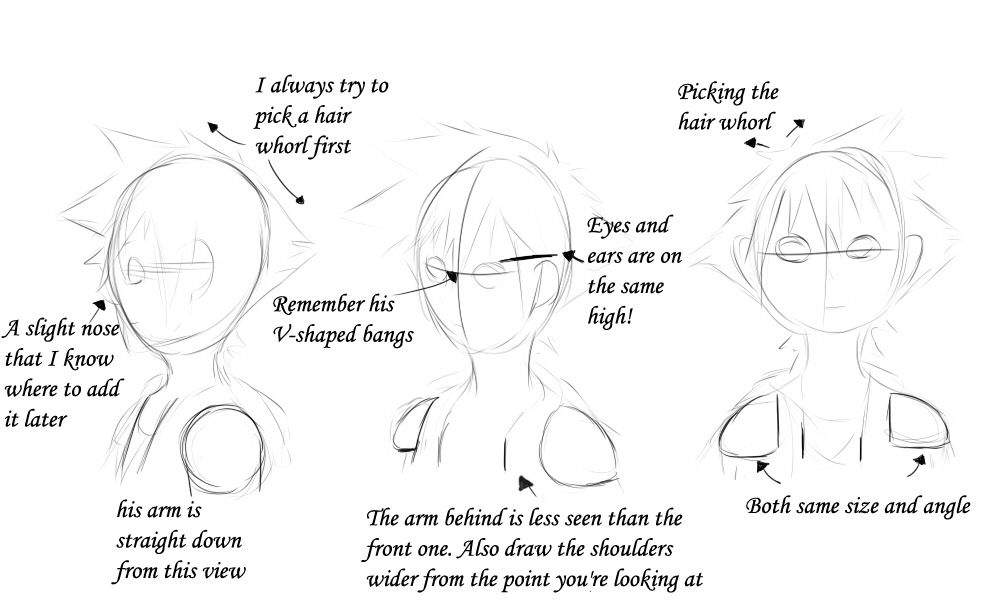
Since I want to go through several steps later, I first go with the head/ shoulders.
If you draw a headshot, it's important that you get the position between shoulders and head right for your character. For example:
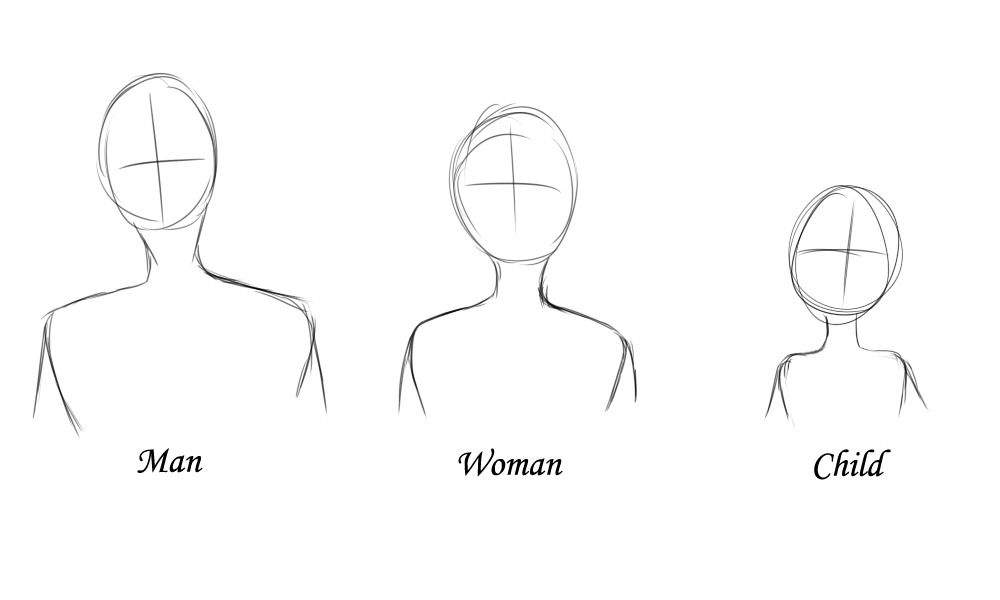
When I draw males I do the shoulders slightly wider as the females. So they get a kinda delicate look. As for the children, you can remember that their shoulders are only a bit wider than their head.
But since Sora is a teenage boy, I will go more towards the female one. Also, when I draw fanart, I try to keep in mind the original style of the series (that's just my personal decision, so feel free to do whatever). In KH most of the characters have a bigger sized head than a normal person would have, so I try to match that.
Now for the sketches:
Plain and simple (I love simple stuff, haha).
I did these three, because I think they're the most used ones (if you want to see another, just ask).
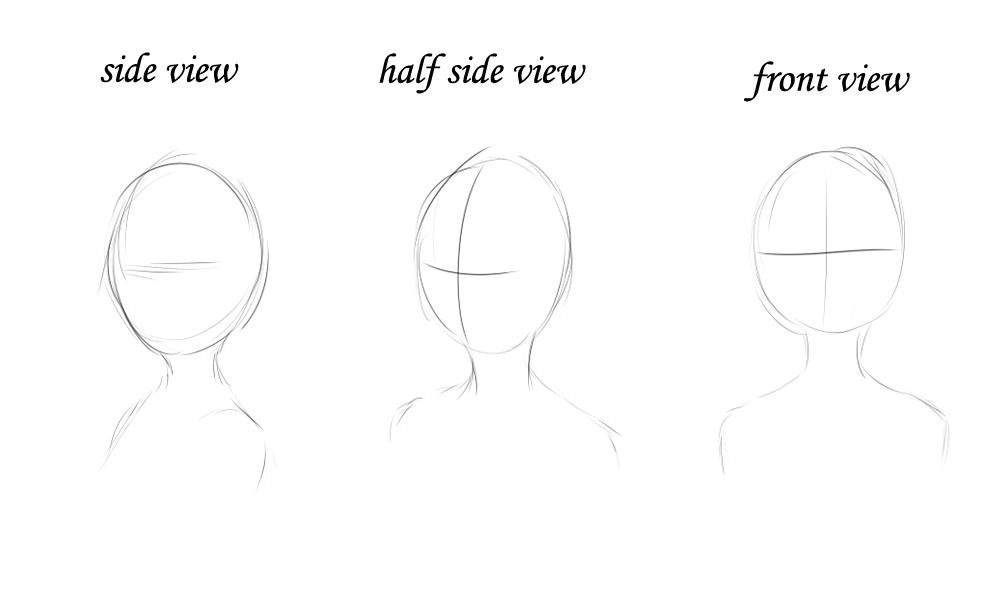
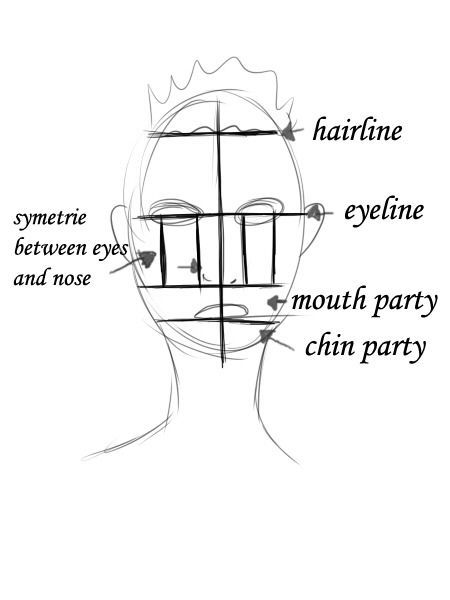
To make the face as symmetric as possible, I always use this cross. And try to keep the head as a circle, to avoid making it too long or too small.
There are also more detailed ones you can use if you're still unsure about where to go. They look like this:
lol
But since I'm a lazy person I go with the first one and rather try around later if it's not symmetrical enough. Also not every persons face is symmetric (the more symmetric the more attractive someone is tho, haha)
Step 3
(rough sketch)
Now I add rough details like clothes, hair, and a bit of expression. Here I go with a simple smiley face and KH2 clothes, because that's the one most used (and my fav :sparkles: ).
These are still rough sketches, so no worry if it still looks messy!
Just make yourself clear from what point of view you're looking at, to get the head, shoulders and arms right.
Very important: If you're unsure about something look it up! If you dunno the clothes; look it up! Every artist looks up references for their drawing (even the big ones), because it's a big help to clarify what exactly you're doing.
A tip:
If you flip your artwork (digital) or hold it under a light (traditional), you get a look at it from another persons view, so you can fix a few mistakes through that!
Step 4
(body shape)
Now to drawing the body shape, so we can add the clothes and hair more easily afterwards. When I already know which body parts will be covered later, I usually draw those parts less detailed and less dark than the other ones to save time. But if your not sure, rather draw to much than less :ok_hand:
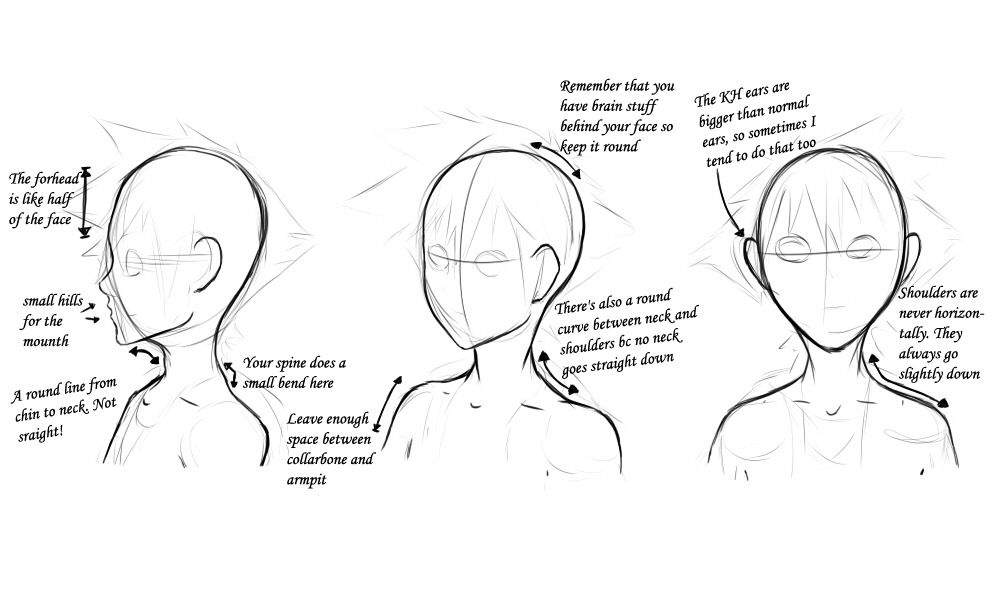
No body has sharp edges, so be sure to make the lines as fluid as possible.
Step 5
(expression)
The most difficult part (for me at least), is adding expressions and feelings to a character.
To say it clearly: Drawing the face.
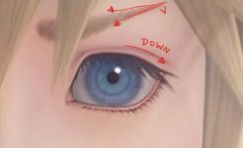
There are sooo many expressions I can't explain them all, haha. But I think the eyebrows show like 70% expression, so lets take a shallow look at them:
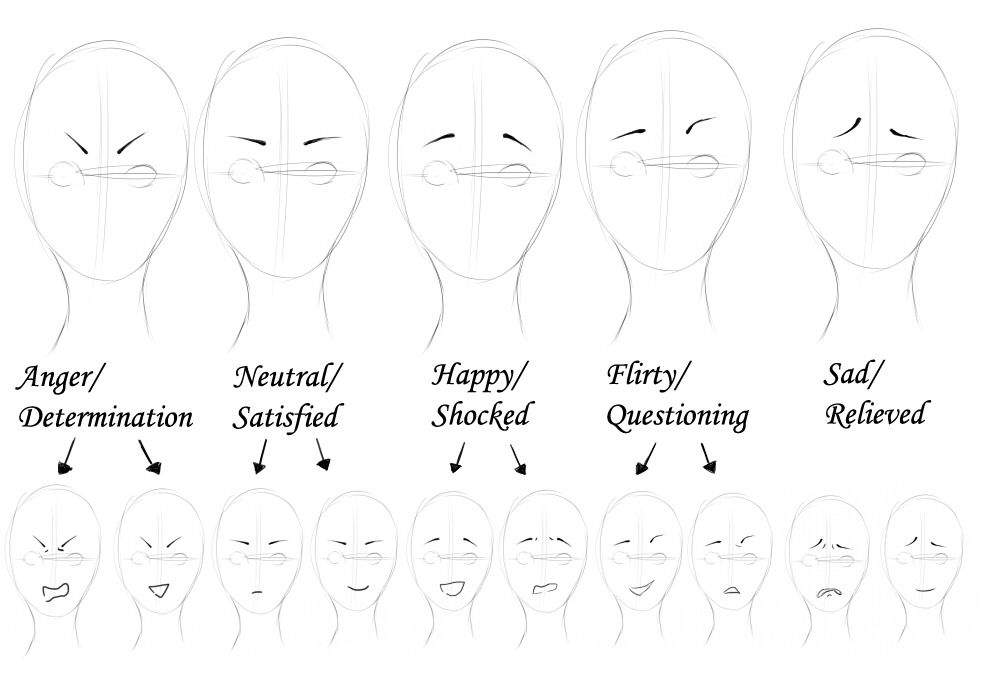
These a just a few of them, but with just two lines you can add a lot into a face! And it's a good practise to just look into a mirror, while doing funny faces. It became a common thing to me (and many other artists) to imitate the expression of a character, while drawing them.
Back to Sora!
Here I just used the plain old smiley face, haha:
The expression doesn't have to be finished yet. I just do it as good as possible to not struggle on that later on (what happens rly often orz)
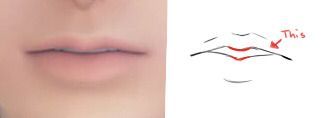
Another mistake I tend to do is the form of the lips. It's nothing majorly important when using Manga/ Comic style, but it still can come in handy:
What I also noticed in the cutscenes (gosh he is so pretty omg), is that his brows are also kind of V shaped and his eyes are slightly Asian shaped, so I try to do that too. But again it's just my own habit, feel free to draw however.
Step 6
(refining the sketches)
We are now hitting another difficult part…
Cleaning the sketches.
I usually leave the sketchlines as they are at first, whether be it digital or traditional, because the still have the most fluid lines and help if you mess up. Only difference in traditional is that you still shouldn't draw the lines too dark while refining yet, since you can't lighten them up like in digital.
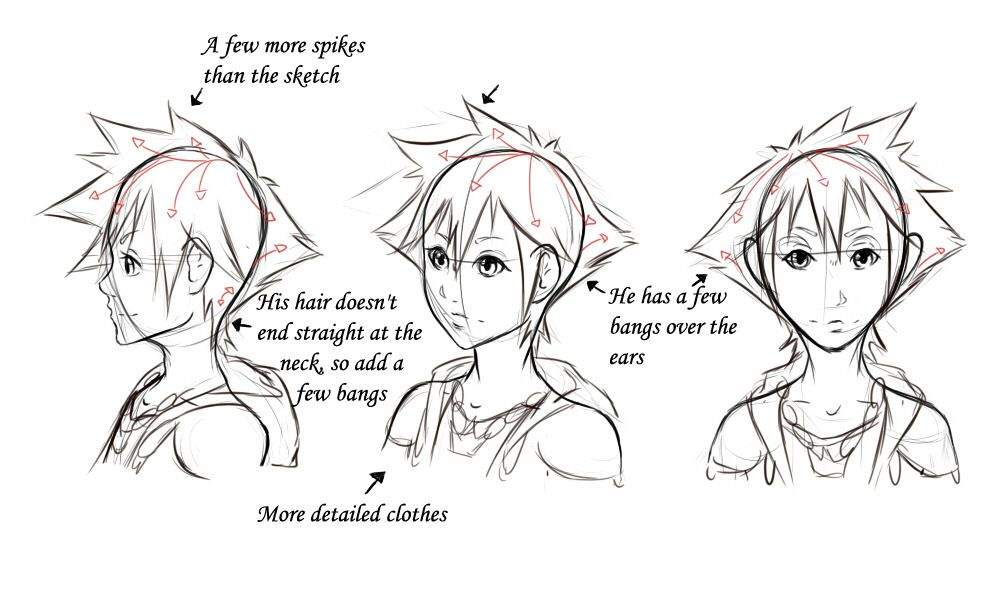
The first few times I drew Sora, I especially struggled with the hair. That's why I highlighted their flow from the whorl to the hairs end, hoping to give you a better understanding of it:

When you drawing the head, make sure it has a stable neck, because our head is as wide as our neck and not a thin stick (I just noticed my Sora has a too thin neck too lol)
Step 7
(lining/ inking)
The last step before the drawing is finished!
My favourite part tbh, haha. I do this different in traditional and digital tho.
In digital mode I work on all steps from sketching untill now on one layer. So I draw the outlines again thickef and darker while trying to erase the sketchy lines around to get them a sharper.
For traditional I just take the refined sketch and ink the lines. Trying to thicken the lines where shadow falls.
A tip:
If you mess up the inking, you can whether make the lines thicker to use it as shading, or just add a new detail to the drawing.

You know, his necklace kinda annoys me, so I don't draw it sometimes. Still on pc, there's a way to speed this up.

So!!!
Now we have a finished Sora!!
:tada: :tada: YAY!! :tada: :tada:
At least his head is, haha.
The body
We know small Sora and teenage Sora, that's why I'll try to explain both of them.
(Just so you know I'm not good at drawing kids at all xD)
Again, before we start, we want to decide on a pose. Poses can be quite difficult, depending on how you want them to be. Especially if you want to use perspective. Try to imagine where you're standing while drawing this, and which parts are near to you, and which are far away. The parts pointing to you are the biggest, even when it's actually a small part:

It may help to imagine some kind of block or an equal shape to determine where you draw the parts. The point that's headed to the camera, is the biggest and can be blurred when close to the viewer. Remember that references are always of good use!
I decided for normal poses tho, since the body is seen the best like that. Now to the first sketch:

To get a better image on what the body should look like, you can use simpler forms, like the red boxes I drew. When you draw females, make sure to widen the hips and shorten the length of the shoulders to make it more feminine. And remember to give children small shoulders too.
Now to the rough clothes and hair:

(*than adults)
Evolution built children with the intention of being cute, that their chance of being adopted and not being eaten is higher lol. So give them those kawaii eyes and hands!!! :ok_hand:
Next is the refined sketch:

Yes, hands give the characters more life and expression, but are hard to "handle" as well, haha (bad joke alert). To give myself a bit of a practice on it, I'll try to say a nip of them too

Understanding anatomy and muscles is helping a lot when drawing, so using the bones as framework makes things a lot easier.
After drawing the bones I just add the skin. Then just cleaning them out with a few corrections

As you can see I'm not good at drawing hands at all, haha. But the more I try, the better I'll get drawing them!! And you will to!
Okay, now back to the body, now with the outlines:

It's finished though it isn't as fluid as I wanted it to be. But there is nothing wrong with that as you continue learning when you go on :two_hearts:
Trying to make it look alright and defining the lines isn't something I usually do, so maybe that's why it looks so stiff here QwQ
After all the human body is a weird one and takes a lot of time to make it look right!! Don't let it get you down!! (๑•̀ㅂ•́)و✧
Very important:
Please don't be disappointed when your art doesn't compare to your imagination! Don't be disappointed in yourself! Art is nothing to be learned over night! All artists took hours and hours to practise to get better. So when you do lots of practice, you WILL get better, I know that in fact. Even if you don't like your art now, take it as your road to learning and as a stepping stone for your future works!!
You know I used to draw like this 4+ years ago:

And a few weeks ago I finished this:

The poses kind of look alike. But the anatomy proportions became more stable and right.
Even tho I think the first one looks horrible as hell, it still was a stepping stone for me! Thus I'm proud I never gave up, even when others laughed at my drawings!!
So keep pursuing your goal!! :two_hearts:
Tips of the day:
- Always use references!
- Do drawing studies to improve faster!
- Try to draw as much as possible if you want to get better (every day at best)!
- Don't compare yourself to famous artists!
- Redraw or compare your old art with your new ones to gain motivation or to cheer up!
- Set youself a goal!
- Art blocks happen but will be over!
- Don't put too much pressure on yourself!
- Be proud of your drawings!
- Never give up!! :sparkles:
#curatorreview
Source: https://aminoapps.com/c/kingdom-hearts/page/blog/how-to-draw-sora-tutorial-for-the-400-follows/Ke5m_JnTMuL2QBeP5Xkbd8rzkgdN5Bb3EX
0 Response to "How to Draw Sora Step by Step"
Post a Comment